What Is A Cattle Panel Arched Trellis And Why Build One
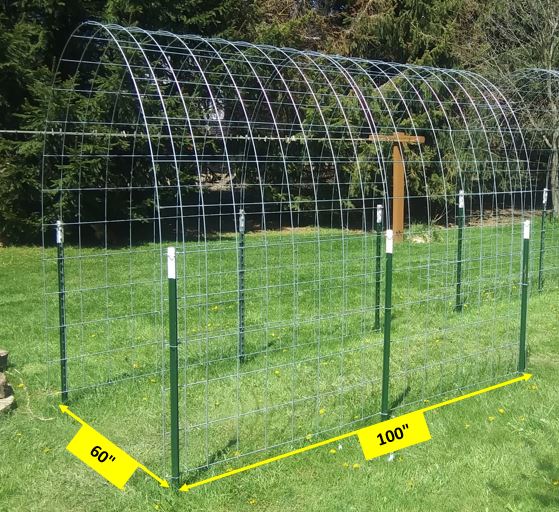
A cattle panel trellis is simply a 16′ section of cattle panel with one short end anchored to the ground at one point and the other short end anchored several feet away from the first, creating a wire arch. Depending on the distance the two ends are anchored from each other, the arch height is typically 6-7 feet tall and allows two climbing trellises for vines or vegetables planted at the bases. Ours are 60″ wide and measure 81″ from the ground to the top of the arch. A wider base will shorten the height a bit and a more narrow base will create a taller arch. Narrow arches will need additional side support to keep the sides from bowing out wider than the base.
A few years ago we were using cattle panels as climbing structures for our ground garden. They were simply placed vertically on their side and secured to t-posts giving a 50″ high climbing fence. We had a leftover section and decided to put one end in a raised bed and the other in a second raised bed creating a climbing arch between the two beds. Both methods worked but the arch has a nice visual appeal to it and walking under the growing vegetables is a pleasant experience. This year we decided to expand our garden and went with additional cattle panel arched trellises with raised beds at the bases. Our goal is to add more growing capacity as well as enjoy the visual impact these will add. This build guide is for a trellis “tunnel” 5 feet wide and just over 8 feet long.
One thing to keep in mind when building a cattle panel trellis is what will be at the bottom of the trellis. If you’re planting in the ground then you may want your trellis sitting on or very close to the ground. If you’re planning to use pots or raised beds then you may want to adjust your trellis higher off the ground.
Selecting The Material
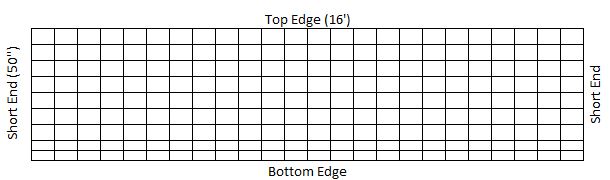
A cattle panel typically comes it two lengths, 8′ and 16′ both of which are 50″ wide. These are heavy duty fence sections made from 4 gauge wire (just under 1/4″ diameter) welded at the wire crossings. We went with the 16 foot length along with 5′-6″ t-posts and metal fence clips for the build. We picked them up at our local farm store and when the panels are gently bent into an arch shape and placed on their side they fit nicely into a utility trailer. At the end of this article is a complete list of materials and tools used.
The panels only weigh about 32 pounds but are floppy and wiggle around when trying to carry them by yourself. I found that by carrying them vertically in the arch shape they were much easier to maneuver around by one person.
If you don’t have access to a truck or trailer, there’s a guide on coiling up the panel here to fit it in an SUV, minivan, or possibly passenger car.
Width & Height Ratio Considerations
When formed into a vertical arch with each end placed on the ground at a spacing of 60″ apart, the top of the arch measures right at 81″ high. We also wanted the trellis to be longer than the 50″ width of the cattle panel, so we put two panels together edge to edge creating a trellis “tunnel” just over 8′ long (100″ to be exact).
The diagrams below give a general idea of several width to height ratios based on our backyard measurements. These are based on a t-post height of 42″ above ground and keeping the panel vertical to the top of the post, then allowing the panel to curve inward and upward in the arch shape.
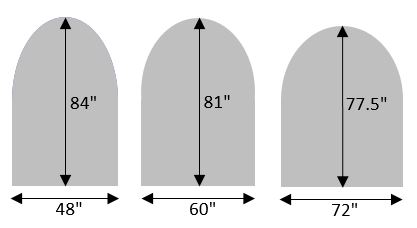
We used two panels and 6 t-posts for each trellis tunnel. Placing the end t-posts 8′ apart lengthwise allows a couple of inches at each end for the metal clip attachment. Also, the t-post in the middle where the two panels come together is a good structural connection point. The footprint below shows the t-post layout and dimensions.
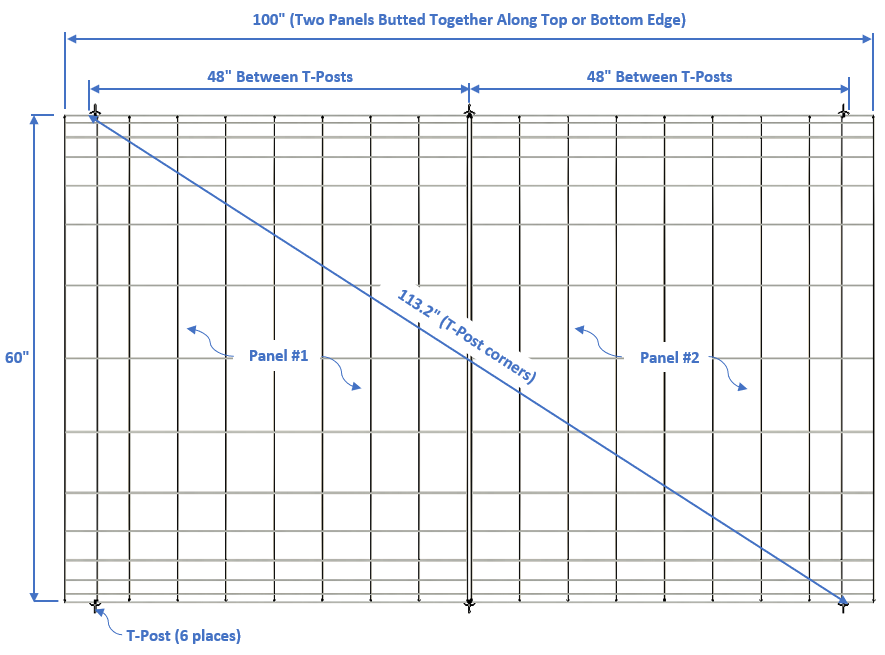
The panel will extend about 2″ past the end t-posts with the dimensions shown.
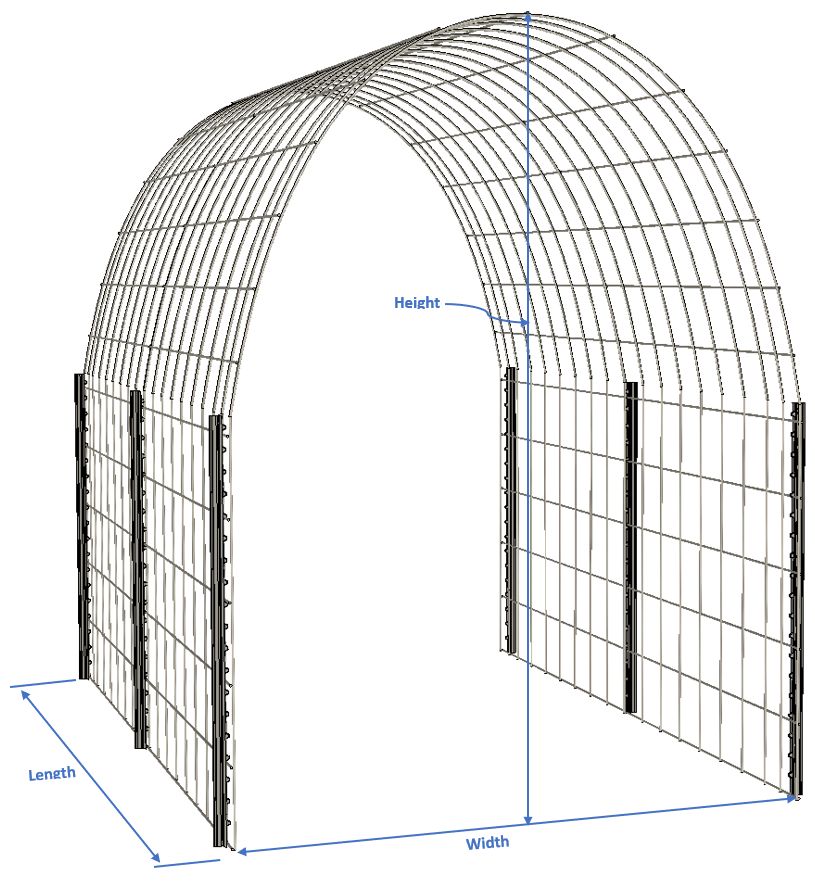
This t-post layout gives a vertical arch shape similar to the diagram below. Placing the t-posts outside of the panels allows the spring tension of the panel to press against the t-posts taking some of the force off the connectors. This is particularly important if nylon zip ties are used instead of wire clips.
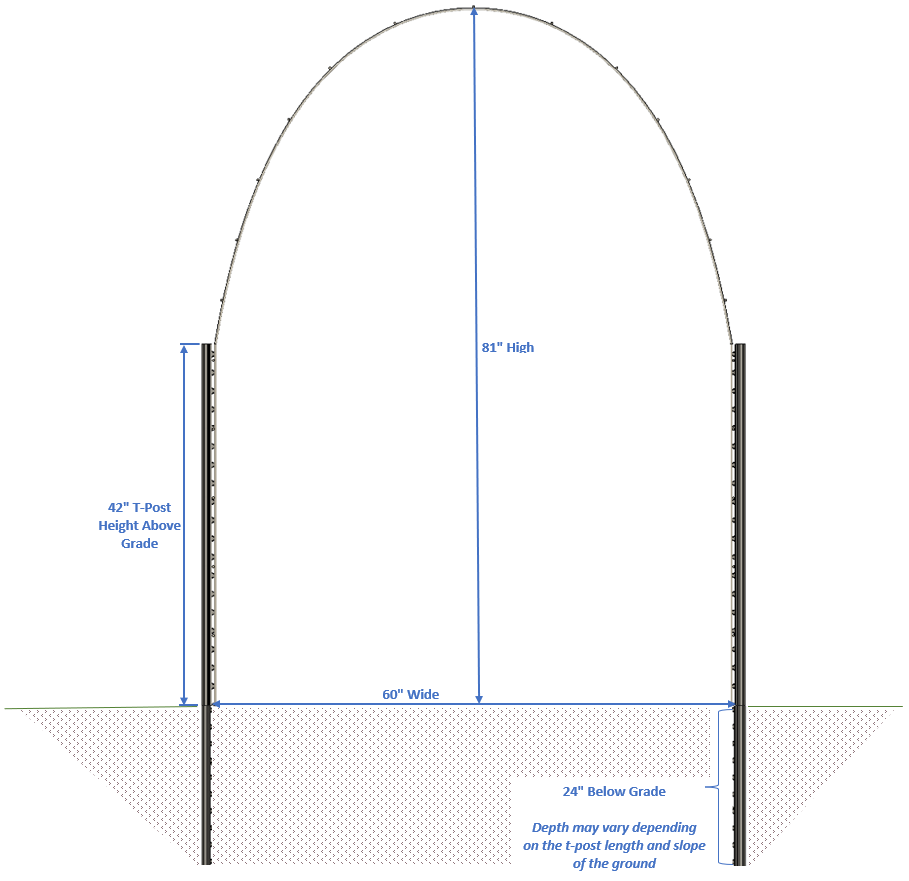
We have clay soil and driving the t-posts to a depth of 24″ is a quick process with a t-post driver. If you plan to use a hammer, then the process will be more difficult. Also, rocky ground can make driving the t-post a challenge no matter which tool is used.
T-post drivers come in various lengths and weights. The heavier ones have the extra weight to pound the post harder but are heavier to lift. The lighter ones are easier to lift but will not set the post as deep with each pound using the weight of the driver.
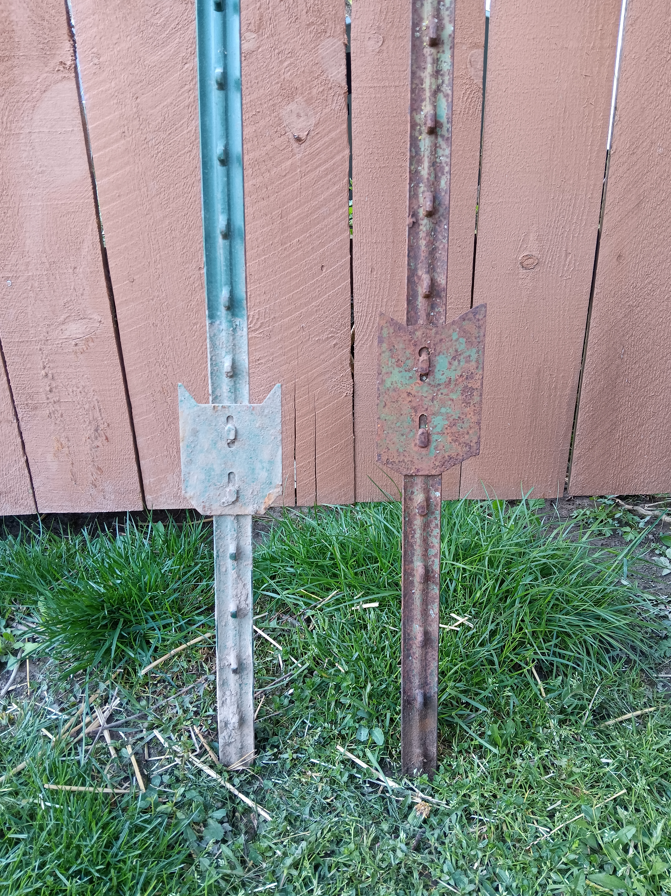
Most of the t-posts I’ve purchased have the anchor blade with the top of the blade about 15″ from the bottom end of the post. So, the post needs to be about 16″ or more in the ground to fully bury the anchor blade. However, the blade height may not be universally the same on t-posts purchased elsewhere. The older post on the right has a blade height of about 18″. Be sure to check this height when purchasing t-posts.
One other thing to keep in mind is that if you are building on sloped ground, then the lower areas may need longer t-posts in order to achieve the same horizontal level at the top of the post with posts on higher ground.
Build Process Quick Overview
- Layout t-post footprint
- Place cattle panels in place and allow to spring against the t-posts
- Use zip ties to connect the two panels together at the top of the arch and above the t-posts
- Start at the highest ground level and secure the first panel at the top of the corner t-post
- Do the same at the second t-post at the same end of the tunnel
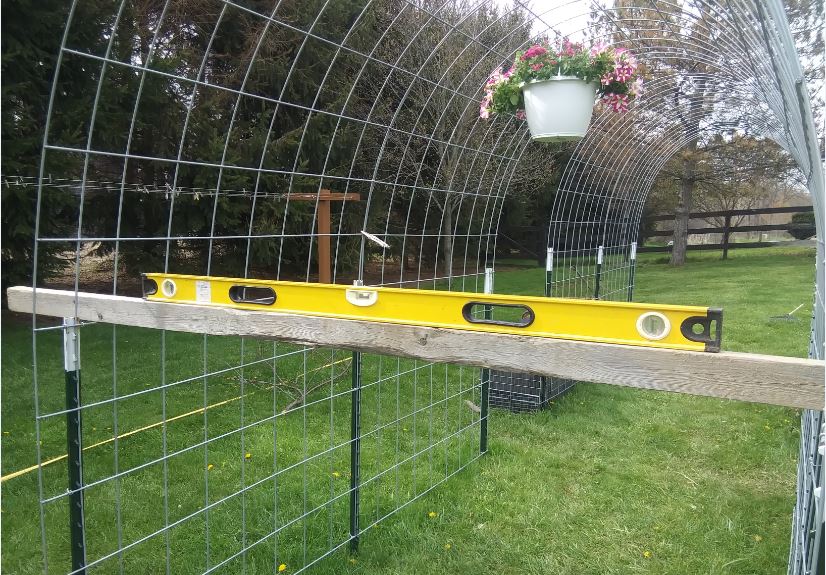
- Check for level from side to side
- Temporarily connect the middle t-posts at the top and check for level to the corners and side to side
- Attach the final two t-posts at the top and check for level
- Go back to center t-posts, check for level and secure with wire clips. Install one at the top, middle and bottom
- Attach remaining wire clips on corner posts
Attaching The Panels To The T-posts – A Few Options
Before you place the panels into position determine which ribs of the panel you want facing out. We put the vertical ribs facing out in case we ever decide to put greenhouse plastic over an arch. It seems to make more sense than having the horizontal ribs facing out. However, the t-post are also on the outside so those will have to be contended with if we turn a trellis into a greenhouse.
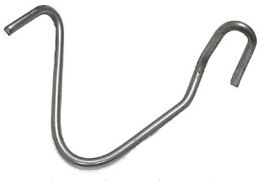
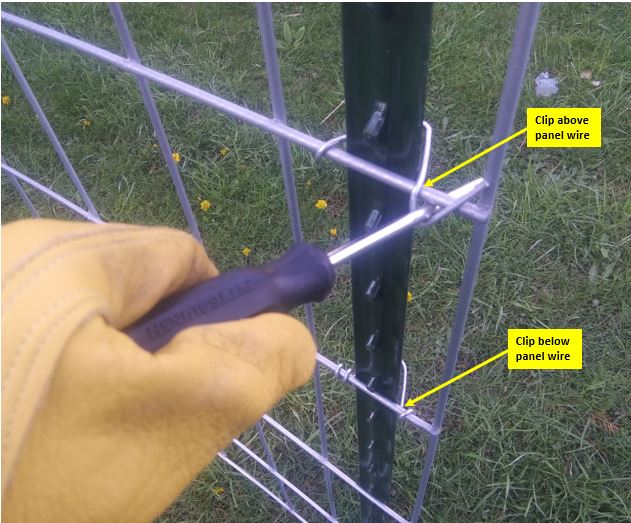
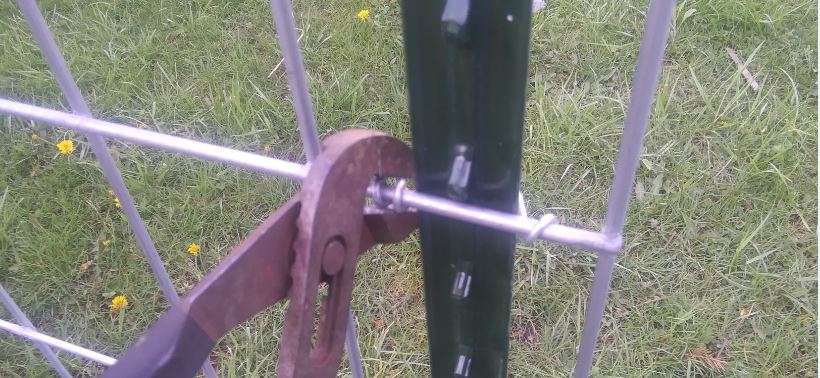
There are no instructions on the package but the clips are also pretty simple to install. A medium size screwdriver and pliers make the job simple and quick.
Zip ties could be used as well but they’re not nearly as strong as the metal clips. I broke several 8″ nylon zip ties during the temporary setup of the panels. If you decide to use nylon zip ties as the permanent attachment means, then you may want to take note of their UV rating. Not all zip ties are created equal. Some are intended for outdoor use and are more UV resistant than others so they should last longer. Another option is to use stainless steel zip ties. These are available at Harbor freight and online from sources such as Amazon.
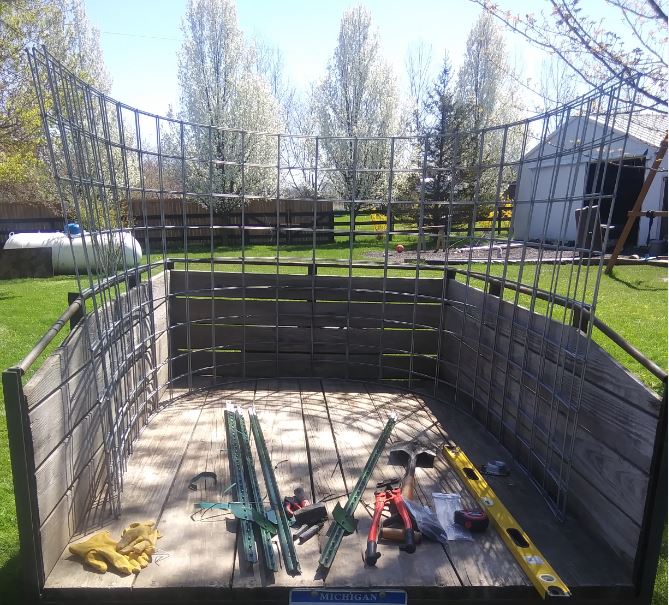
Attaching the panels to the t-posts is easier said than done. The panels are a bit unwieldy and want to spring back to their original shape. A helper will make this build go a lot easier. Also, nylon zip ties are useful as a temporary fastener to hold the panels in a general position while attaching other parts of the panel with the metal clips. Depending on how level you want your panel horizontal lines (wires), the construction can get a little tedious.
Once the panels are close to being in position then start at the corner with the highest ground level and reference that corner as position (A). If your location is already level, then it may not matter which corner you start at but still reference the first corner as (A). We raised our panel about 1″ off the ground at this point. At the other end of the trellis the bottom of the panel is a couple of inches higher off the ground with the panel leveled. We used nylon zip ties to temporarily connect the two panels together at the top of the arch and about a foot above the top of the t-posts. This allows the two panels to loosely move as one large arched panel.
Panel-To-Post Attachment Sequence
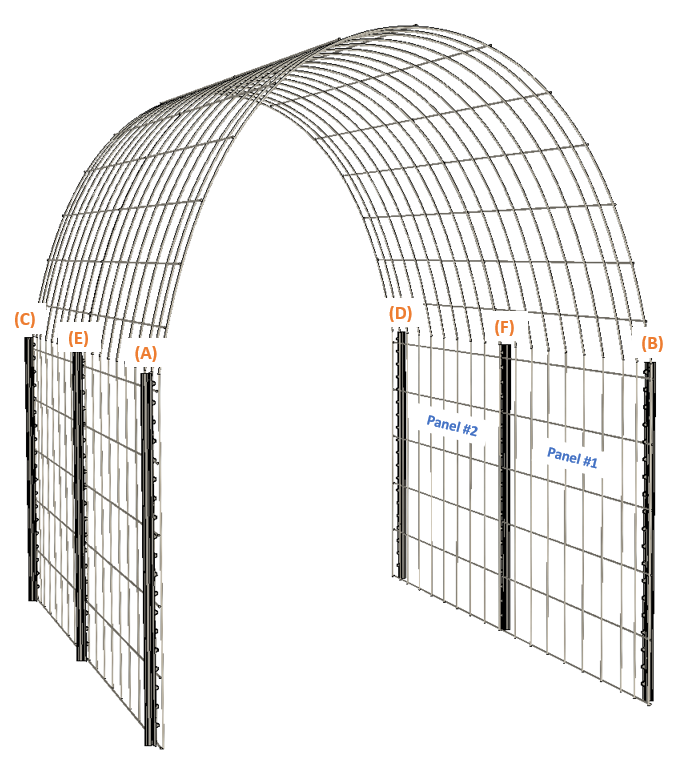
Starting at corner (A). Attach the first panel near the top of the t-post. Only at the top, not further down the t-post. Come back and secure the rest of the post later. Then go to the opposite corner (B) at this same end of the trellis and level this corner with the first corner (A) using either a long level or a level on a board long enough to reach across the arch. Again, only attach the panel to the t-post near the top. This will allow the panel to adjust as you work your way through the tunnel of the arch.
After the first end of the trellis is attached then work your way down to the middle t-post (E) where the two panels meet. Now level the panels at this post but only use a zip tie to temporarily secure the panels here. This will be permanently secured when the second panel has been attached at the other end. Do the same for the other middle t-post (F) as well.
Now attach the final two t-posts at the end of the tunnel, (C) and (D). Attach at the top only. If you have leveled the entire trellis arch then this end may be several inches higher off the ground than the first end, depending on how level your ground is.
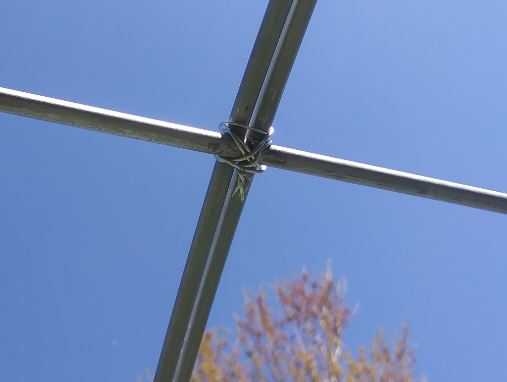
Finally, go back to the middle posts (E & F) and secure the two panels to these posts with wire clips. Check both panels visually and for level before finishing all clip installation.
Finishing The Connections
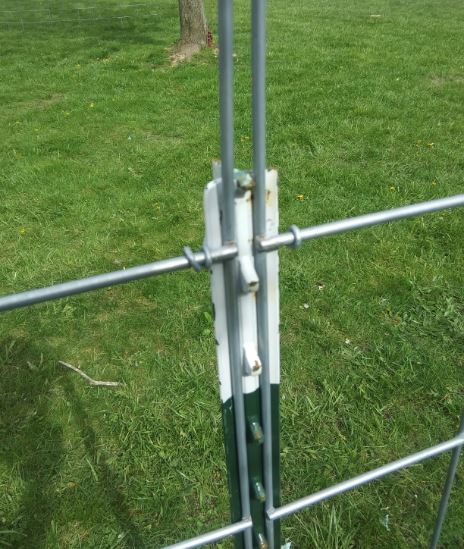
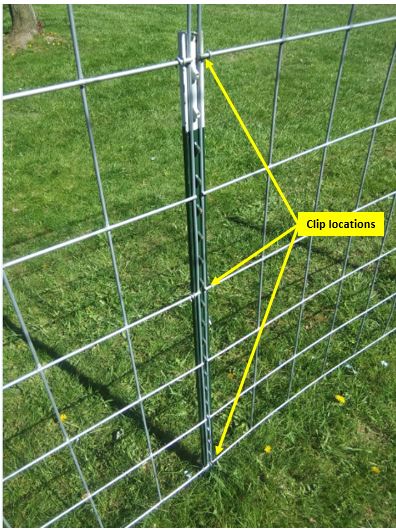
We placed three metal clips on each t-post, one at the top, middle and bottom.
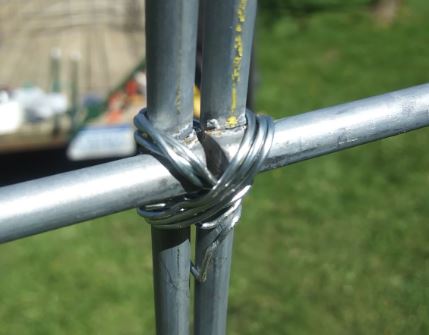
Also we permanently secured the two panels to each other above the t-post where they came together in the middle of the arch. For this we used 20 gauge galvanized wire.
Ready For Use
Once you’ve made these connections your arched cattle panel trellis construction is done. Now it’s ready for whatever you want to plant at its base. Any climbing vegetable or vine should work well but so far we’ve had good success with these vegetables:
- Butternut squash
- Cucumbers
- Peas
If you plan to build your own cattle panel trellis hopefully this article gives you some ideas. There are many ways to build these and checking out other designs may help you finalize the style and method that works best for your needs. This is a satisfying little project that takes about 2-3 hours to complete and immediately makes a visual impact. Once it’s covered with vegetation the impact can be stunning and the anticipated harvest fulfilling.
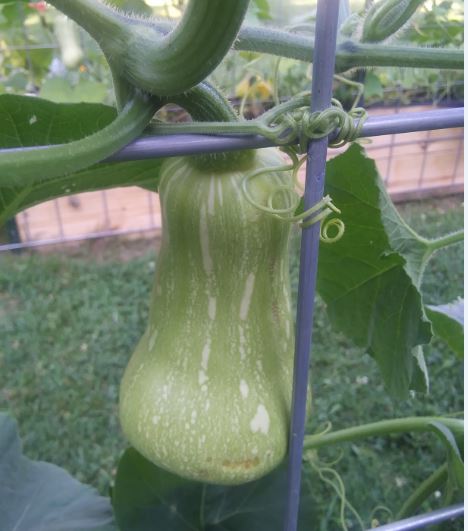
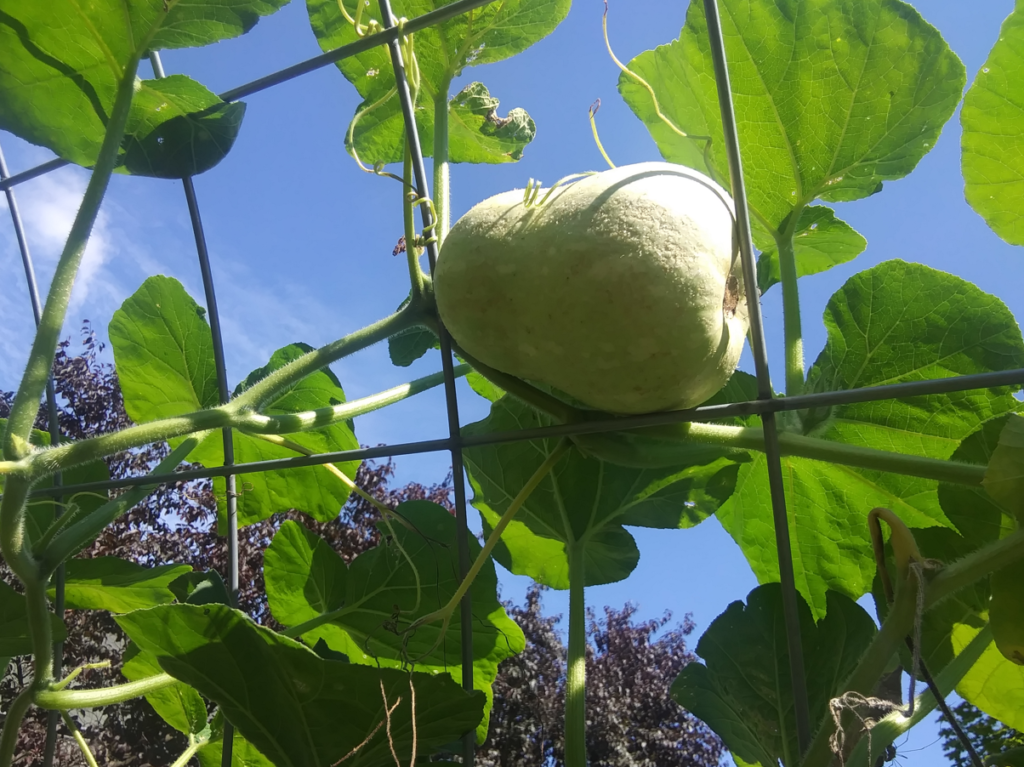
We built three trellis tunnels in early May and then added raised beds at the base to plant butternut squash. By mid-July the squash plants had embraced the trellis and the squash fruit seemed to be doing fine just hanging around.
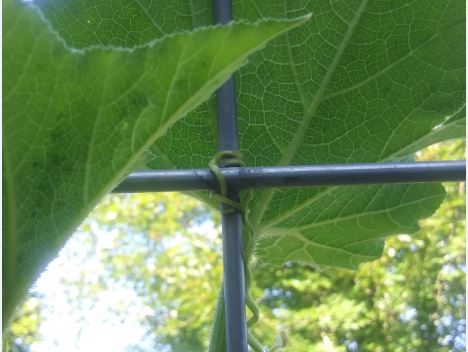
There can be mishaps depending on what is growing. This squash was rescued just before getting stuck between the panel wires.
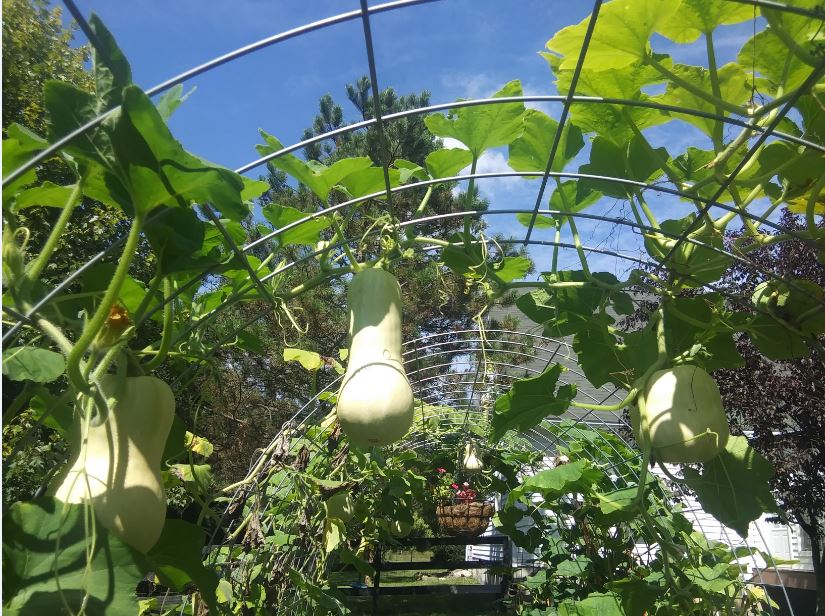
By mid-August the squash plants reached the top of the trellis and were still producing fruit.
Below is the list of materials and tools used for this build.
Material Used
- Cattle panel, 16′ x 50″, 4 gauge (2)
- T-post, 5′-6″ (6)
- Metal fence wire clips (1 bag)
- Zip ties, 8″ (several)
- Galvanized wire (17 gauge)
- Stainless steel zip ties (optional)
Tools Used
- T-post driver – (small sledgehammer could work)
- Safety glasses
- Work gloves (need good dexterity and not too bulky type)
- Pliers (slip joint works well)
- Screwdriver (medium, round shaft – to twist metal clips)
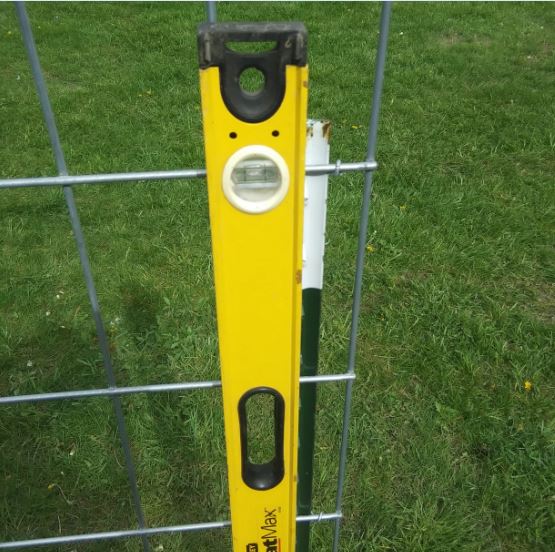
- Carpenter’s level (24″ – 48″)
- Tape measure (12′ minimum)
- Wire cutters (for zip ties and galvanized wire)
Sources
Below are links to some of the tools and/or materials. These are affiliate links and if you make a purchase through the links on our website we may earn a commission.
- T-post driver I use (ebay)
- T-post driver which is available in both 12-pound & 18-pound versions (Amazon)
- 17 gauge galvanized wire
- Wire cutters
- T-Post wire clip online alternative (Amazon). This one worked in addition to the ones from TSC.
Items can be purchased locally at hardware stores, home improvement stores, and farm stores.
27 responses to “Cattle Panel Arched Trellis: DIY Build Guide”
-
Thanks so much for your article. I’ve been “thinking” on how to do this for a year. When I searched for guidance your article popped up and gave me all the details I need to make my project successful on first try. Thank you so much!
-
You’re welcome, hope it works out well. Thanks for the comment.
-
-
Hi, thanks for taking time to make this for others, it’s super helpful– I’m curious if it’s possible to do this with rebar instead of T-posts?
-
Not sure about the use of rebar instead of t-posts. T-posts are more rigid compared to rebar at the same length. However, perhaps if the rebar is secured along its length to the cattle panel with wire or something similar it may work out just fine. Maybe tie (wire) them together every place the rebar and cattle panel cross. If you use rebar, I’d be curious to know how it works out. Good luck.
-
-
I am going to see if I can talk my husband into doing something like this for some of the squash. You had mentioned planting them first in a garden bed, and then from there, the plant itself would attach to the arch. How close should the garden bed be to the base of the arch? Also, besides squash, what else can you use?
-
We planted squash around 6-8 inches from the trellis. Make sure it’s a climbing type, not a bush type. One year we tried butternut squash which had no interest in climbing. They may need to be guided into the trellis early on but then in our experience they do the climbing on their own. Some maintenance guidance may be needed as they grow. On the arched trellis we’ve also planted a climbing variety of cucumbers and beans. The squash covered fuller and made a more visually appealing canopy if that matters to you. We’ve planted sweet potatoes in a ground garden, and they climbed vertical fencing so they may be a good candidate as well depending on your climate and soil depth.
-
-
Excellent article. I am short so if I used a 16’panel and wanted it 7′ wide how tall would it be? I want to be able to pick produce without using a ladder. I would use your method and lay it out on the ground, but we are stuck inside in this terrible ice storm, so I am using my time making plans for better weather. Thanks !
-
Thanks for the comment. Unfortunately, it’s cold and snowy here with frozen ground currently. The height to width dimensions in the article were based on measurements at the time. However, based on some rough math I would guess the height to be a little over 6′, roughly 73″ with a 7′ wide arch. I do remember that at some width the arch was too flat and the top became a little unstable instead of being a rigid arch. Not sure if that width was 7′ or 8′. Hope this helps, it’s the best I can do until spring.
-
-
Your details are super informative, concise, and easy to follow. Over-spec’d is not an adjective I’d use here. Thank you for attention to detail and photos that illustrate exactly what you’re talking about.
Glad I found your article! All the best,
Bill in East Point, GA-
Thank you.
-
-
This was great – thank you for the detailed specs. Some of us dummies need them.
-
Thank you.
-
-
Which way direction did you orient it? The arch opening running east/west or north/south?
-
Ours have the openings running north/south.
-
-
I am thinking of doing this, I am just wondering how you worked out the different heights of the arch based on the width? I already have supplies so know my material lengths, I just can seem to work out how high my arch will be if the mesh is 6m long, 2.4m wide etc.
Thanks-
I made a temporary arch setup and measured the height at various widths to see what worked best for our needs. Basically, as described below.
1. On level ground I staked the panel at the ground so it would keep the desired width. I used screwdrivers in the ground to hold the panel in place. Sticks, tent stakes, or other methods should work fine.
2. To keep the panel from bowing out wider above the ground I used a ratchet strap to pull the sides inward in order to keep them vertical up to the height of the t-posts. Past this point the panel will rise upward and inward for the rounded top of the arch.
3. Used a tape measure to measure the height from the top of the panel to the ground. The panel may try to skew to one side or the other so you may have to push the panel a bit to keep the top of the panel centered between the anchored sides at the ground.
This gave a pretty accurate estimate for what the trellis height and width would be.
At some width, which I don’t remember, the panel will no longer bow out. However, in this case you may have to pull the sides outward to keep them vertical if you want that. This will also pull the top to a lower position – I think. I don’t remember trying an arch that wide. Our panels were 16 ft. (4.9m) long so they seem shorter than what you have if I understand your dimensions correctly. At 6 ft. wide ours became lower in height than what we wanted. We settled on 5 ft. wide. The wider the arch, the lower the height will be.
Hope this helps. If not, you can contact me at info.diytype@gmail.com. This might be a useful update to the article.
-
-
Love this article and you explained the directions. I am going to do this for my morning glory and clematis vines. Thank you so much.
-
Thank you! Hope it turns out well for you.
-
-
Thank you for the detailed instructions and links to supplies!
What direction should these face? i.e. if I were walking through the archway would I be walking north to south or east to west? thank you!
-
Ours have the openings at the north & south directions. We put raised beds on the east & west sides and the plants seem to grow equally well on each side. Our biggest issue now is shade from nearby trees, so that plays into the location as well. Thanks for the comment, hope this helps.
-
-
Hello, This is a great idea and the directions are very well written. This is probably a little over spec’d for me but better safe than sorry since I lost last years trellis and tomatoes to a wind storm. My plan is to build this for a 4 foot wide x 1 foot high raised bed. Where would you recommend placing the posts, inside or outside of the bed? I also have clay soil beneath the beds. Thank you for the plans and for your input regarding my question.
-
Hi and thanks for the comment. We placed our raised beds against the trellis posts, but the posts are outside of the bed and that’s how I would do it again. Not sure if one location is better than the other, but I would not bury the cattle panel if it were in the bed.
I understand about “over spec’d” but ours have been built for a few years now and I was looking them over this spring. They still look straight, plumb, and level. Nothing has come apart and they’re holding up. I’m sure they’ve moved somewhat with the freeze/thaw cycles of the clay ground but visually they’re still appealing. Hope this helps.
-
I have 25 raised beds w cattle panel arches. I put the posts inside of the beds,(some wood some metal) . The panels fit between the wood and the post. It’s cleaner than putting posts and panels on outside and we didn’t find the support of the panels against the wood necessary.
-
-
This is a great idea and article. The t-posts are 5-6″ – I thought they came in either 5′ or 6′ lengths. One of the diagrams show them 42″ above ground. So if they are 5′ long, that means they are 18″ into the ground – that seems pretty deep. Would appreciate if you could confirm the height of the t-posts that were used. Thank you!
-
Hello, below is a link to the 5′-6″ t-post at Tractor Supply. We have a few posts left over and I did confirm the length of 5′-6″. They’re actually 1/2″ short of that length.
https://www.tractorsupply.com/tsc/product/franklin-industries-studded-t-post-5-1-2-ft125-lb-per-footWe have clay soil and pounding the posts that deep is pretty quick with a t-post driver. I used this one.
https://www.tractorsupply.com/tsc/product/speeco-post-driver-post-pounder-speeco-deluxe-s1611051tscI went that deep because the clay also gets soft when water soaked in the spring, and I didn’t want the panel pushing the posts out and changing the shape of the trellis arch. If you have different soil that may not be a concern. We recently visited a relative in Arkansas and I don’t think a t-post could be driven that deep without great difficulty in that shallow rocky soil. A shorter post may work better for you.
Thanks for the comment. I’ll consider updating the article addressing this.
-
Thank you so much. This is a great idea for Seniors or people who dont want body pain of bending in conventional gardening.
We have orange clay-sandy loam soil.
Thank you again 4 doing all the sacrificial work for us.
KLewis in TX
-
You’re welcome, and thank you.
-
-
-
Leave a Reply