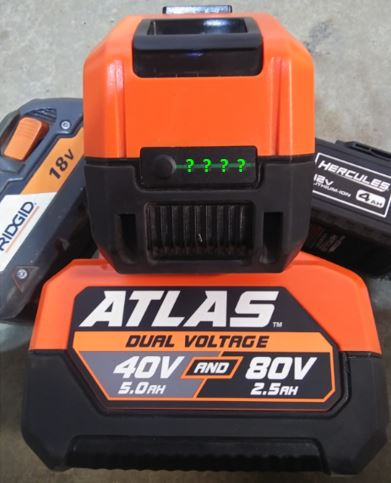
After our recent purchase of an electric push mower (Atlas 80V Brushless Cordless 21″ Push Lawn Mower) I started wondering if it might be possible to charge the batteries from solar power and potentially eliminate our use of increasingly more expensive electricity for charging tool batteries. We already had some small scale solar capability for our sump pump and pellet stove backup power so it wouldn’t be a large expense to do some experimenting. I also did a little testing of a Ridgid 18V battery and a Hercules 12V battery.
Bottom Line Up Front
It is possible to fully charge cordless tool batteries of various voltages from solar power provided the correct type of inverter is used. All of the chargers tested required a pure sine wave inverter in order for the charger to even turn on. None of these chargers would work on a modified sine wave inverter. So, provided you have the proper setup which, among other components, includes the correct type and size of inverter, it is possible to charge cordless tool batteries from solar using the 120VAC charger normally used to charge the batteries from household power (grid power).
If your solar charging plans include a portable power bank then the setup gets much simpler. All three of the chargers tested worked fine from a Jackery Explorer 290 power bank, which is one of the smallest they offer at the time of this writing. Jackery and many others have solar panel kits available so they’re pretty much plug and play – expensive plug and play. Cost aside, this may be the best solution for most people. These power banks can do a lot that a fixed system can plus they’re portable. So, if you want to take your cordless tools camping or head out on some other off the beaten path excursion, taking the portable power bank is a convenient way to recharge your tool batteries and power other devices as well such as phones, fans, lights, etc.
Sometimes the solar setup should not be portable. Our sump pump has a solar backup (homemade variety) which I do not want to take apart and use for other purposes. This setup is a lot more DIY, and it is also less expensive. This type of setup is the focus of this article and will also be compared to the small Jackery we have. However, the goal here is primarily to give an overview of charging cordless tool batteries from solar and explore some possibilities. An actual solar system design is beyond the scope of this article.
The Basic Components
In very simple terms there are two types of current (electricity) discussed in this article. Direct current (DC) which is what batteries store and provide for use, and alternating current (AC) which is the type of electricity provided in typical household receptacles. So, VDC means volts DC and VAC means volts AC.
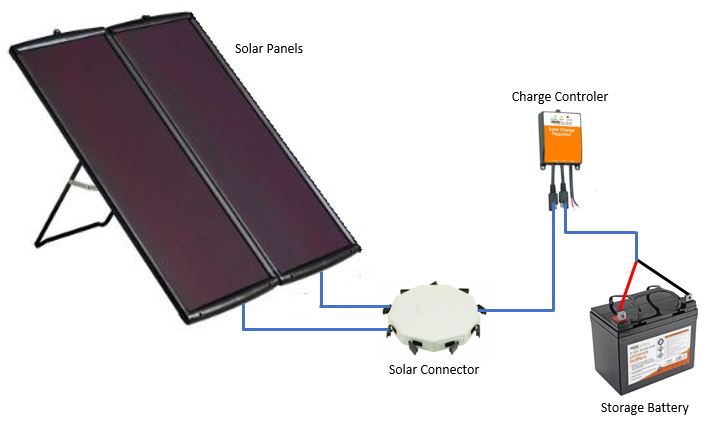
To be clear, this is not about charging tool batteries directly from solar panels. This is charging the tool batteries from a solar power system. So, the solar panels are charging a different battery (storage battery), then this stored energy is used to charge the tool battery. This system includes the items below.
- Solar Panels – These collect the solar energy from the sun and convert it to electricity (DC).
- Charge Controller – This device takes the electrical energy from the solar panels and charges the batteries (DC).
- Battery (storage battery) – This battery stores the electrical energy. The battery releases its energy in the form of direct current (DC).
- Inverter – This device takes the DC stored in the batteries and converts it to AC, typically 120 volts AC (VAC), which is the same as the electrical power in typical household receptacles in the USA. This is the source of power for the tool battery charger.
Typical power banks like the Jackery and others provide items 2-4. As an accessory most, if not all, can accommodate solar panels which completes the list above.
Small Scale DIY Solar Setup

The components in this small setup are mostly items available at Harbor Freight. It may not be the best, most efficient or even most desired equipment, but it is probably the most available and easiest to get started with. Besides, where else can you walk into the store and get all the solar setup needed as well as the tool, battery, and charger?
One thing to keep in mind is that the inverter itself consumes a small amount of power from the battery just to run it’s own internal circuitry. So, a fully charged storage battery will eventually be drained by the inverter even if nothing is plugged into the inverter. When using an inverter the storage battery needs to have its charge maintained either by the solar setup or some other charging source. Another option is to turn the inverter off when not in use to avoid draining the storage battery. Also, this “idle” current will vary from inverter to inverter, something to consider when shopping for an inverter.
Solar Panel
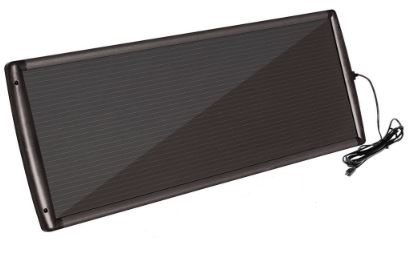
The solar panel is the Thunderbolt 25 watt model. So, on the best conditions it could deliver close to this amount of power but here in Michigan we don’t get a lot of the best conditions. The solar panel will be the main device that determines how quickly the storage battery will re-charge. We have 2 panels combined together (50 watts) and It took 11 days to recharge the storage battery during during late July/early August. We’re located at about the 45th parallel and the panels are tilted to 45 degrees.
Charge Controller
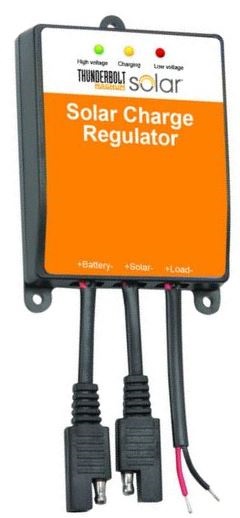
The charge controller is the Thunderbolt 100w model. It’s only taking in 50% maximum of it’s rated capacity from the solar panels and there were not any of the heat issues listed on the Harbor Freight website comments section. This one never got hot during the testing.
Storage Battery
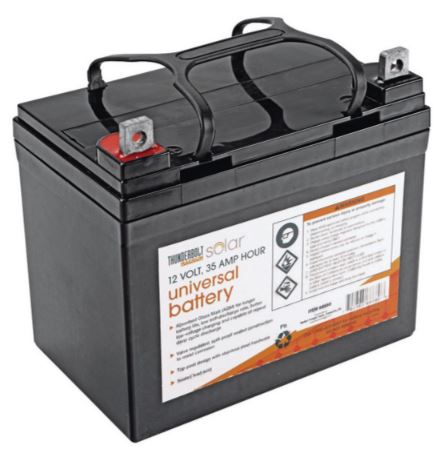
The battery is the Thunderbolt 12V, 35 amp hour sealed lead acid battery. Just from the numbers, this battery may seem to have plenty of stored energy to charge the Atlas 80V 2.5 amp hour battery (40V 5.0 AH). In my testing the fully charged storage battery could charge the tool battery one time and was down to 12.0 volts (57%) at the end.
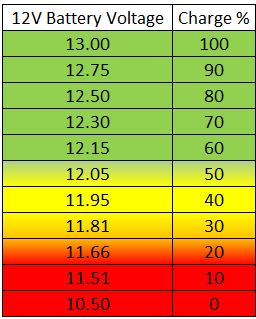
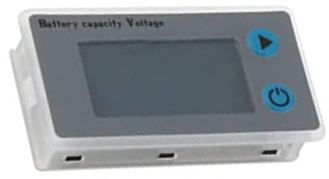
The state of charge is calculated based on the chart below and compared to the battery monitor shown. The battery capacity tester had a slightly different Voltage and % charge range than the chart. In retrospect it would be better to check battery voltage with a meter providing two decimal place accuracy, like the chart shows.
Pure Sine Wave Inverter
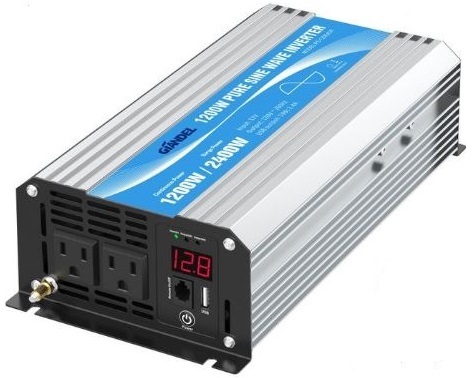
For this test I used a 1200 watt Giandel pure sine wave inverter purchased from Amazon a few years ago and used as a backup for our pellet stove in the event of a power failure while it’s running. The 1200 watt output is much more than needed to charge the tool batteries. The battery chargers use less than 100 watts each (AC).
This particular inverter consumed 0.3 amps (300mA) of idle current. So, just being turned on with no devices plugged in it drew this much current.
As mentioned earlier the inverter needs to be a pure sine wave inverter, not a modified sine wave inverter. The difference is in the waveform of the AC output. A pure sine wave inverter will have a smooth waveform similar to household power. A modified sine wave inverter mimics this waveform but is a more choppy simulation.
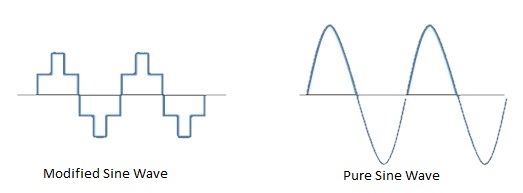
Pure sine wave is a premium feature and any inverter that is pure sine wave should state so clearly. If an inverter does not show this feature then I would presume it to be a modified sine wave inverter.
The chargers in this test (Atlas 80V/40V, Ridgid 18V, and Hercules 12v) all used less than 150 watts of power when charging. The Hercules charger was the only fast charger. Although not tested, judging by the numbers a good pure sine wave inverter down to 300 watts should work for charging a single battery at a time. Personally I’d go with a little larger inverter just to have a some extra capacity.
The Charger’s Personality (AC Amp Draw)
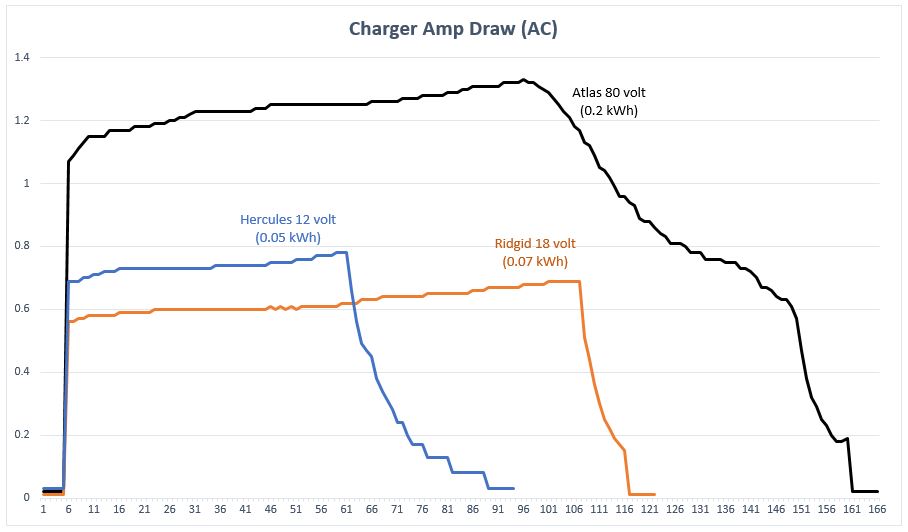
Before testing with the solar setup I charged various tool batteries from an AC wall outlet and took amp readings to see what kind of numbers could be expected during the charging with the battery setup. The entire charging process took about two hours and forty minutes using the standard Atlas charger. The graph above reflects amp readings every minute.
Drain On The Storage Battery

During the test I took an amp reading every 6 minutes to get 10 readings per hour, 28 readings total. Since less measurements were taken the resolution isn’t as fine as the earlier amperage graphs but they look very similar in shape as the charger graph while plugged into the wall outlet. The amp draw from the storage battery (DC) was about 5.67 times higher than the amp draw from the inverter (AC).
Battery Voltage During Charging
The tool battery was charged at night from just the storage battery. The solar panels were disconnected, so there was no solar panel input to re-charge the storage battery during the test. There seems to be various levels at which lead-acid batteries are considered fully charged but there is a pretty close range of values for the range a battery needs to be maintained without damaging the battery. In general the battery should stay between 12 and 13 volts with 12.7 considered fully charged. Anything below 12 volts is discharging the battery below 50% which could damage the battery. This storage battery was charged by a AC powered battery charger and started at 13.2 volts DC.

At about the half-way point this began to feel like a race to the finish between the storage battery voltage dropping and the Atlas tool battery charging. As the graph shows, the 12V, 35 AH storage battery did charge the 80V, 2.5 AH tool battery before dropping below 12V, but just barely.
The “Kil-A-Watt” meter showed a usage of 0.2 kWh from the storage battery to charge the Atlas battery. Using this as a baseline of how much the storage battery could supply, it may charge the Ridgid 18V battery three times and should charge the the Hercules 12V battery four times before needing to be recharged.
Storage Battery Re-charge With Solar
I used our sump pump solar charging panels and charge controller to recharge the storage battery. This is two 25 watt solar panels, the panel combiner and the charge controller. I used a different 35 AH battery (still a Harbor Freight battery) which had been sitting around uncharged for a while and down to 11.9 volts (51%) on the battery monitor. The re-charge time for this battery to 12.7 volts was about 4 days.
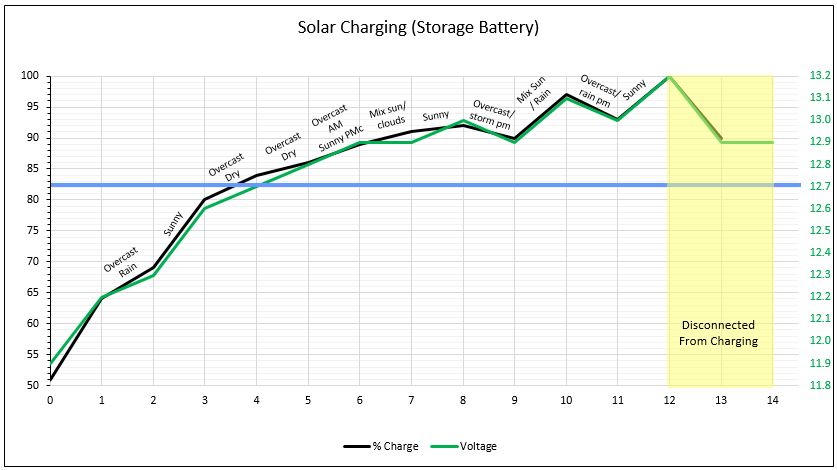
Basically, the battery remained connected to the solar setup and checked in the evening after the panels stopped providing enough solar and the charge controller amber “charging” light turned off. Charging took place during the last week of July and first week of August. The days were a mixture of sunny and overcast as indicated on the chart. This happened to be a fairly rainy couple of weeks for this area of Michigan.
Charging With The Jackery
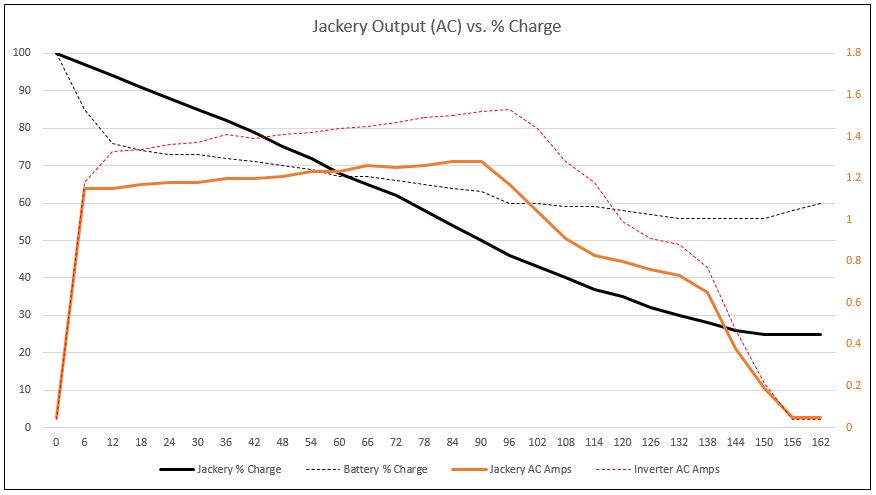
The Jackery has a 290 watt-hour battery (0.29 kWh) and it drained down to about 25% according to it’s display. It did finish the tool battery charge. The cooling fan turned on & off a few times during the charging and the output voltage stayed steady at 110V AC. I don’t have a method of connecting our solar panels to the Jackery so the time to re-charge from 50 watts of solar panel is unknown.
Conclusions
I have a new appreciation of the AC power available from a wall outlet. It was a bit surprising how much stored energy (storage battery) it took to perform a task I do without even thinking about, that is charging tool batteries. Also, it was little disappointing how long it took to re-charge that storage battery from our two 25 watt solar panels. A larger system would be needed to keep up with our outdoor tool battery usage during the summer months. We typically use 2.5 to 3 of the larger batteries each week for mowing and trimming.
From a financial standpoint it would take a very long time to pay for the system just from the savings in electricity costs from the power company. It took 0.2 kWh to charge the Atlas battery. At a rate of $0.18/kWh here in Michigan that’s only about $0.036 to charge the tool battery. I do, however, still like the idea of having a solar power charging station.
So, from a hobby/interest standpoint this could be reasoned as a doable project for me. Maybe even from a redundancy or backup power standpoint. At this point I’m contemplating a small system with a single 100 watt solar panel, 100 AH battery, higher end charge controller with Lithium capability and at least a 600 watt inverter. However, it’s a long way from saving significant money on electricity costs at this point in time.